Thursday, August 14, 2025

Tagliatelle with Purslane Sauce


[First published on August 27th, 2011]

What is August sauce? Well, I had all those tomatoes, and the leftovers of a plump bunch of purslane (the rest went into purslane curry). And I wanted something fast that didn't cook too long, because the pre-hurricane atmosphere is warm and soggy and needs no encouragement from a blazing stove.

From my rooftop farm collection, I chose the big Green Cherokee tomato, which weighed in at just under a pound. It was very juicy, quietly sweet, and low on acidity. And green. Very green. A long, flat pasta is good for this - small and rounded and shellish and the bits of tomato and purslane would get lost inside and hide out in clumps. With ribbon pasta the sauce just slides along each strand.

I don't often cook with butter but in this case it adds a velvety background for the fruitiness of the very ripe tomato. And a hurricane is coming. I mean, you gotta live. The sauce is in two parts.

Serves Two.

Lemon Sauce:

1/3 cup cream
2 Tbsp butter
Half a lemon's zest
Half a lemon's juice
Salt and pepper

In a small saucepan scald the cream: Meaning, cook it at a simmer for about 4 minutes. It will reduce slightly. Add the butter to the cream and let it melt, while stirring. Off the heat, grate in the lemon zest, and squeeze in the lemon juice. Another stir. Season this with salt and pepper. Taste. Set aside.

Meanwhile get your pasta water boiling. Submerge your tagliatelle.


Tomato and Purslane Sauce:

1 Tbsp butter
1 1/2 cups chopped up tomato such as Brandywine, or another similar heirloom
1/2 cup loosely packed purslane leaves (and seed capsules if it is late in the season)
1/2 cup parmesan, finely grated

In a second small saucepan, melt the butter and add the tomato when it is foamy. Cook over medium heat until the fruit exudes its juice, stirring to prevent sticking. Add the purslane, stir, season with salt and pepper. After a minute or two turn off the heat. This is a barely-cooked sauce.

Drain the just-cooked pasta, return to its still-hot pot. Pour over the cream sauce, toss, and add the tomato and purslane sauce. As you toss, gradually add the 1/2 cup of finely grated parmesan.

Serve at once, in warmed bowls.


Monday, July 14, 2025

Thai chicken curry


[Updated 7/14/25.] This is my favourite chicken curry recipe, a staple over many years.

It was born from the memory of a wonderful curry made at The Elephant, a Thai-French hybrid owned by a Frenchman on East 1st Street in the East Village in the early and mid oughts. I used to eat lunch there sometimes, when I worked around the corner, at my garden-designing desk. Lunch was a fraction of the dinner prices, although the menu was exactly the same. This curry was rich and deep, a little salty and a little sweet and also a little sour. It was perfect.

It took me a while, but as far as my taste buds are concerned, this is it.

The Elephant closed a few years ago, so I can't go back to compare.

Part of the curry's charm lay in its presentation - a deep white bowl of amber sauce with islands of chicken, carrot and potato breaking the surface, sprinkled with shredded mint. And beside it, a dinner plate with a dome of jasmine rice, a tiny banana, one side of it neatly cubed, the other lying lengthwise beside the cubes, small pieces of mango, a sprinkling of roasted peanuts and half a lime, sliced not across, but from top to bottom, off-center, no mean wedge but a generous, squeezable handful. I usually ate the curry from the bowl, adding lime and mango and banana and rice as I went.

For Two

1 Tbsp coconut oil or other oil
4 cloves of garlic, chopped finely
1 finger of ginger, peeled, and thinly sliced
1 medium onion, chopped finely
2 Tbsp tomato paste
1 Tbsp shrimp paste (or 2 salted anchovies - not the same, but not bad)
1 Tbsp palm sugar or brown sugar
1 Tbsp tamarind paste (subst. 2 Tbsp lime juice plus 1tsp sugar)
2 chicken thighs and 2 drumsticks
1 lemon grass base, sliced in half
3 Tbsp fish sauce
1 can coconut milk, without any additives, if possible
2 medium potatoes, in quarters, or 4 small, whole potatoes
1 large carrot, peeled, cut in large chunks
3 cups of water
1 Tbsp red chile flakes (this is not proper), or two hot dried Thai chiles
3 fresh makrut lime or lemon leaves or 1 dried Persian lime (heresy, but it has the same effect, really)
3 sprigs Thai basil
Fresh mint or cilantro or both
1 lime, cut into wedges
3 Tbsp roasted peanuts
1 ripe banana

Sauté the garlic, ginger and onion over medium heat till the onion is translucent, about 6 minutes. Add the tomato paste, shrimp paste, sugar and tamarind. Stir to caramelize the tomato a little, and add the chicken pieces, allowing them to take a little colour, about 4 minutes

After a couple of minutes, add the fish sauce. Things will get smelly. Now add the coconut milk and stir very well to scrape up the sticky bits on the bottom. Add the vegetables, top with water until just covered, and stir again. Add the chile and lime/lemon leaves.

Cook at a simmer until the chicken is about to fall apart, about 1. 5 hours. Taste. You are aiming for slightly sweet, a little tart, hot, rich. You can add some more fish sauce or some lime juice if you like. Just before serving add the fresh basil and stir in.

Serve with steamed or sticky rice, with a side of chopped banana, a sprinkle of chopped roasted peanuts and fresh mint or cilantro. More lime is good, squeezed over just before eating.

This goes well with cold, cold, c-c-c-c-cold beer.

Thursday, July 6, 2023

Tuna Mousse - Cold Food for Hot Days

It wobbles, it jiggles, it's straight out of the beginning of the middle of the last century. It's wonderful. Wrong, somehow. But wonderful. And inhalable. 

We  - the Frenchman and I - used to eat it on our rooftop in Cobble Hill, accompanied by Don Estorbo, with a wide view over New York Harbor. In those days we had a single air conditioner, whose roaring was no match for the baking heat. The rooftop was our evening escape.

Please make a point of looking for reasonably sustainably sourced tuna. American Tuna, Wild Planet, or Whole Foods 365 brand are better choices. Walk past the Starkist. Seriously. You are better than Starkist.

Here is a Tuna Shopping Guide to help explain.

2 cans sustainably harvested (pole caught)* tuna in olive oil, drained
1/4 cup mayonnaise
1 tablespoon ketchup
4 cornichons (tiny cucumber pickles)
1 tablespoon capers
1 - 2 tablespoons lemon or lime juice
Pepper

Whizz in a food processor till smooth. No food processor? Mash everything finely with a fork in bowl.

1 cup very hot/just boiled water
1 packet (1 tablespoon) gelatin

Dissolve the gelatin in the very hot water. Then measure out one third and add it to the tuna mixture and whizz/mash again.

Taste. Assess salt vs pepper vs lemon juice. Adjust.

Pour tuna mousse-y mixture into a small bowl or mold. Chill for at least 2 hours. To unmold, slide a butter knife dipped in hot water around its edges and tip out onto a serving plate.

Blipprrrrblblrblrbrlrblrblblblb. It wobbles. See?

Eat with good bread or crisp cucumbers, or celery sticks. Or crackers. Or a spoon. Or on your own, with no one else watching.

Tuesday, June 28, 2022

Mulberry Pie


[First published June 2010; updated]

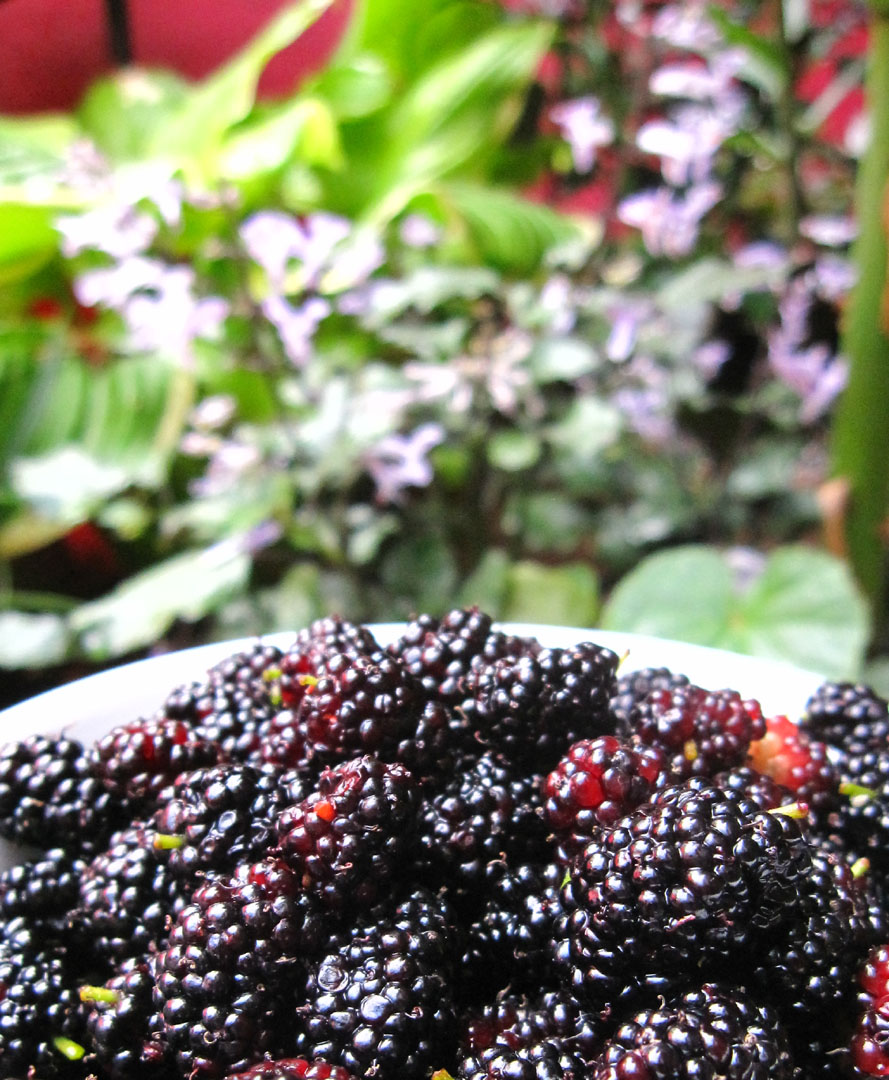
Mulberries. Taste of a Bloemfontein childhood, tree-climbing, stained hands and feet, a bowlful for dessert after a midday lunch around a table. 

In New York I find good mulberries rarely and when I do, they make me tremble. They are best eaten out of hand, or from a bowl with spoon.


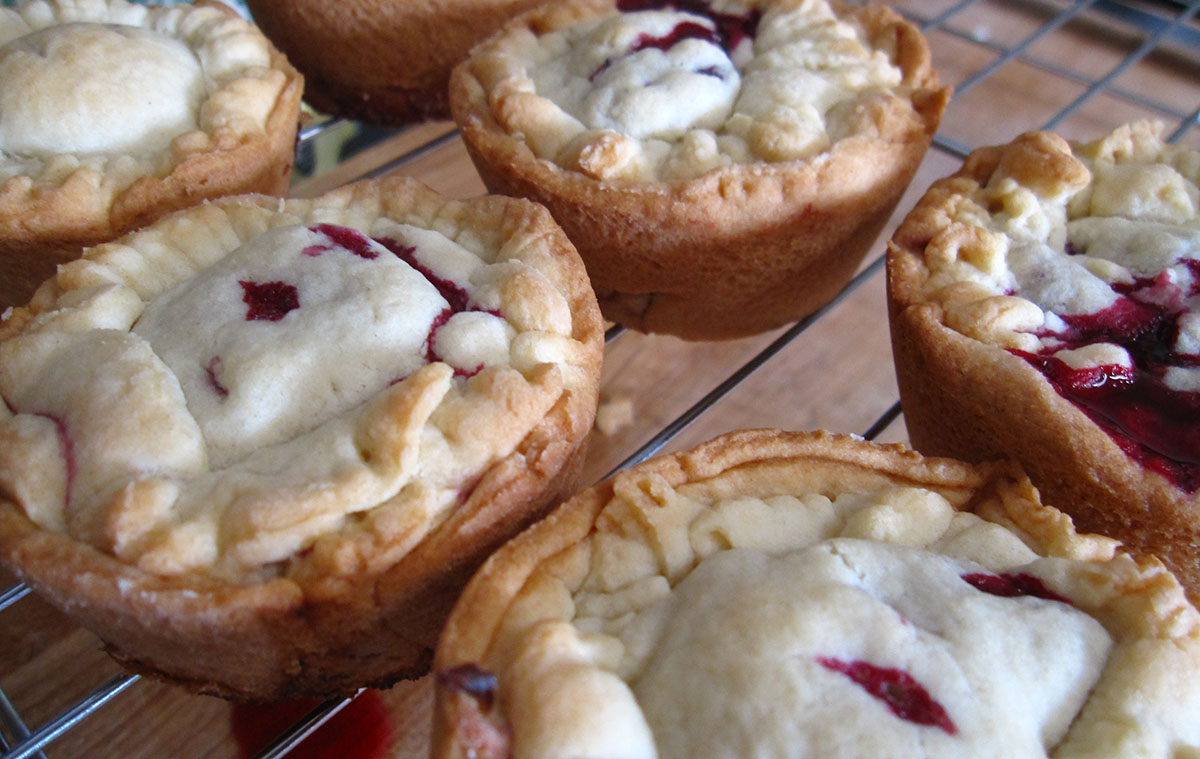
But if you have too many? Lucky, lucky you - they make wonderful tarts.

The pastry I use was designated for apple pie in our house, when I was little. Molly Bolt, a friend of my grandmother's in Bloemfontein, circa 1960's, gave her the recipe. It called for margarine! I use butter.

I never met Molly Bolt, but her pastry lives on (it's in my first book, too, in June's serviceberry pie recipe).


The pie pastry does not need to rest. And it is surprisingly forgiving and versatile. I use it for pies small and large, in a spring-form cake tin, or individual muffin trays, or simply as a flat disk cooked on a baking sheet, to be topped with heaps of your favorite fruit. And: It does not have to be baked blind.


Mulberry Pies

Makes 12 muffin tray-sized pies, or 1 large pie (I bake mine in a springform cake pan).

Mulberry Filling:

5 cups mulberries, stalks removed
1 cup raspberries or serviceberries (Amelanchier sp.)
2 Tbsps sugar

Pie Pastry:

175 gr/6 oz butter
75 gr/2.5 oz sugar
1 large egg, lightly beaten
300 grams/ 10.5 oz flour
2 teaspoons baking powder
Pinch of salt

Preheat the oven to 350'F.

For the filling: 

Heat the fruits and sugar over medium heat in a saucepan till juice starts to flow. Cook at a simmer for 5 minutes. Transfer the fruit to a bowl with a slotted spoon (or strain it). Cook all the saved juice till syrupy. Pour the syrup over the berries and cool. 

For the pastry: 

Beat the butter and sugar till smooth, light and fluffy. Add the egg, with a dusting of flour. Gradually beat in the rest of the flour, baking powder and salt. For into two balls, and flatten slightly. Dust flour onto a board and roll the first pastry ball out thinly.

For a large pie:

Transfer the pastry on your rolling pin to your springform pan, and drape it inside, making sure it comes up the sides and drapes over, slightly. Patch any tears. Add the cool filling. Roll out the second, smaller ball of pastry and cover the pie. Crimp the edges together and cut some slits of steam. 

For muffin-tray pies:

Cut out individual circles to line the muffin tray. I use 3.75-inch cutters to line the tray,  and 2.5-inch cutters for the pie lids. Add cooled filling, and the lids. Crimp, and slit a steam vent in each.

Baking time varies. For a large tart, about 35 - 40  minutes. For small pies, check after 15 minutes. Either way, leave the pies in their baking pan or trays for 10 minutes before unmolding or removing - they are fragile while hot.

Monday, June 27, 2022

Cherry pie

This cherry pie filling is glorious with the compelling flavor of warm cherries. There is no thickening, no gloop, and no overcooking. The result is fresh, and addictive.

In an act of pie-defiance, I like bake pie in spring-form cake tin, unmolding the whole thing after it has baked.*

Cherry Pie Filling

2 1/2 pounds of sweet, firm black cherries
1/3 cup of sugar

Pie Pastry:

6 oz/175 grams unsalted butter
2.5 oz/75 grams sugar
1 large egg, lightly beaten
10.5 oz/300 grams all-purpose flour
2 teaspoons baking powder
1/4 teaspoon salt
1 teaspoon dried sweet clover or mahlab (optional)

Preheat the oven to 350'F. Butter the bottom and sides of spring-form cake tin.

For the filling: Rinse and de-stem the cherries, and pit. Add them to a saucepan with the sugar and heat very slowly, covered. As juice starts to be released from the cherries, increase the heat, swirling the pan occasionally. Simmer until the cherries are just cooked - about 8 more minutes. Pour off and keep the juice. (When it is cool, bottle and refrigerate it for using in drinks, and pouring over ice cream.) 

Let the cherries cool a little.

For the pastry: In a bowl, beat the butter and sugar together until smooth, light and fluffy. Add the egg, with a little flour to prevent the mixture from separating. Beat well. Gradually beat or stir in the rest of the flour, baking powder and salt. Shape into two balls, one larger than the other (1/3 to 2/3 of the pastry, respectively). Flatten each ball. The pastry does not need to chill (but does not suffer if you do chill it).

Roll the larger ball out thinly into a circle that will cover the bottom and reach up and over the sides of your cake pan. Wrap the pastry around your rolling pin for the transfer from board to cake tin. Patch any breaks or tears with extra pastry - it's a forgiving recipe.

Fill the pan with the cooled cherry filling.

Roll and cut out a pastry disk to cover the top, crimping the edges in the way you know best. Make a few slits for steam, and bake till the pastry is pale golden and crisp. Baking time varies, but it is in the realm of 35 - 40 minutes.

Remove from the oven and transfer to a cooling rack. Gently loosen the edges before unlocking and lifting the spring-form. Serve hot or at room temperature.

Tuesday, May 10, 2022

Pine Cone Jam - what it is and how to use it

[Updated from May, 2019]

I began making pine cone jam in May 2019 (I posted about it @66squarefeet on Instagram) after a wonderful shoreline walk on the edges of New York City, where I noticed tiny-tiny baby pine cones. I was actually hunting for pine pollen, but these petite cones intrigued me. They were much tinier than the larger green cones I'd used before to make fermented syrup. I collected a little bagful. 

Looking for ideas back at home, I chanced upon a reference to this jam, and one helpful recipe that noted Georgian heritage. I also scoured searched my Russian and Georgian cookbooks, but came up with nothing. At the time there was very little online. Although I did find bottles of pricey mugolio. It's the richly-flavored syrup that forms during cooking the young pine cones and sold in Italy - the name taken from the pine species Pinus mugo. My first Instagram posts about the jam exploded, and the recipe I posted back then may have nudged things along quite rapidly, online: You will now find many more recent posts and videos.

Russians like it. Eastern Europeans like it. Turks seem to like it. Pine cone jam (sometimes the resulting syrup is referred to and sold as pine honey) is considered treat and medicine. Used for coughs. 

The flavor is tartly sweet, resinous, and the "honey" is like molasses licked from a spoon in a pine forest. It's really nice in drinks.

And it's hard to imagine that the hard little cones become soft and chewable after cooking, but they do.

A traditional Caucasian and Russian way to enjoy them is as a medicinal spoonful stirred into hot black tea. I like them dotted sparingly on crunchy toast atop labneh. Their honey-slash-syrup is delicious roasted with carrots and other root vegetables, stirred into the pan juices to pour over pan-seared pork chops, or duck breast (perhaps deglazed with some bourbon or fruity vinegar), or for dessert, mixed with the first strawberries. 

There is always ice cream

To make pine syrup gin or vodka, add a quarter cup of the syrup with cones to 2 cups of the liquor. Leave for a day, shaking now and then, until the syrup has dissolved. Strain and bottle. It makes noteworthy seasonal cocktails.

The pine cones I collect are mostly from exotic Japanese black pine (Pinus thunbergii), popular in  local seashore landscape and park plantings because of their salt-tolerance. Native pitch pine (Pinus rigida) occurs, too (its little cones are very sharp and rough on the fingers). 

You want immature, small cones, green inside.

While you work, it helps to have rubbing alcohol handy: Your fingers get very sticky, and the alcohol is very effective at dissolving the resin. For clean up after cooking, use rubbing alcohol, again, or mineral oil, to dissolve the very tenacious resin residue on the edges of your pot and any implements you use. 

The first time I made the jam I experimented with five different batches. For the first three I boiled the cones in water (to remove some resin), then another three times in syrup, in the tradition of Russian varenye, where entire fruits are cooked and cooled - important -  multiple times in syrup. 

I also boiled four and five times, and for the final batch made the jam without the water bath, and using honey instead of sugar. That last version was much more resinous when cool, above! It all got stuck. I liked them all, but four seems the magic number, to me. 

The point is that the jam needs to come to a boil often enough for the green cones to be pleasantly chewable, so the number of boil-cools will vary, depending on big your baby pine cones are. Do not skip the cooling. It's time-consuming, but will result in delicious pine cones, rather than hard nuggets.

Pine Cone Jam

For three 1-cup capacity jars of pine cone jam you need:

8 oz (about 2.25 cups) finger-nail-sized immature pine cones*

6 cups water

2 cups sugar

*I've made jam with much larger cones, too. Their size matters less than green-ness. 

If the baby cones still have a piece of stem attached, remove it. Left on it will become tough during the cooking process. Sometimes I skip this part but always regret it! (It's sometimes easier to do this after the boiling step, below.)

The Pre-Boil: Place the pine cones in a pot, cover with water and bring to a boil. Cook at a gentle boil for 5 minutes. Turn the heat off. A layer of resin will collect on the surface like a little oil slick - carefully scoop his layer off, and discard. Then drain the pine cones. 

The Jam: Once all the water is poured off, add the 2 cups of sugar and the 6 cups of water to the pot with the boiled cones. Stir. Return to the stove and bring to a boil. Reduce the heat so that the liquid simmers. Cook at a simmer for 5 minutes. Turn off heat and cool completely. 

When the mixture is cool, bring to a boil again, for 1 minute. Turn off and cool. 

Bring to a 1-minute boil for a third time, turn off the heat, then cool again. Repeat these steps until the liquid has transformed from watery to syrupy. 

Now test a cone. Is it chewable? 

If it is you can stop, and bottle the cones with their dark 'honey' in sterile jars. Or repeat the boil-cool steps until they have softened more and the honey is thick. It can take from five to eight boils, in my experience. 

_____________

Find more wild foods and recipes in my book:

Forage, Harvest, Feast - A Wild-Inspired Cuisine

Thursday, April 21, 2022

Fava bean and knotweed meatballs


I love meatballs. I love fava beans. And then there is the edible invasive weed element.

This recipe is inspired by dishes with a heavy Middle Eastern spin, unapologetic with the spices and herbs.

The Frenchman wolfed these. I only told him he was eating weeds halfway through. That's how you reel them in.

You may know the knotweed story by now. Here it is in some detail, if you don't.

Japanese knotweed hails from EastAsia, as its common name suggests, where it has natural pests and competition. But Reynoutria japonica  (its other botanical names are still floating about: Polygonum cuspidatum, Reynoutria japonica) is highly invasive in parts of North America and Europe (the UK has an annual budget in the millions to combat it).

And it happens to be a really good vegetable in the springtime, when it is tender. Most people do not know that. It is also packed with anti inflammatory resveratrol, which has been cited in treatments for heart disease, cancer, Alzheimer's and diabetes.


I just like the taste. I have still not run out of ways to use it.


Serves Four

Adding breadcrumbs to meatballs makes them wonderfully tender. The dill and cumin reward you with a fragrant puff of flavor when you bite into them. Dill works well with tart flavors, and sorrel-tart is what Japanese knotweed is all about.

(If you don't have Japanese knotweed, increase the lemon juice to 3 Tablespoons, and add a cup of peas to the fava beans.)

For the Meatballs

1.5 lbs ground lamb
1/2 cup Panko breadcrumbs (or coarsely ground bread crumbs)
1 cup finely sliced scallions (or field garlic)
1/2 cup chopped dill
3 teaspoons cumin
1/4 teaspoon salt
Pepper
1 happy hen egg
2 Tablespoons grapeseed or canola oil

For the Sauce

2 cups fava beans, shelled
2 cups tender Japanese knotweed tips
1 Tablespoon lemon juice
1 cup chicken broth
20 mint leaves, torn up
1 Tablespoon olive oil

In a large bowl combine all the meatball ingredients and mix well. (You could do this the day before and leave, covered, in the fridge.)

Form the mixture into golfball-sized meatballs. It helps to wet the palms of your hands every now and then, to keep the mixture from sticking. Put aside on a plate (this can also be done the day before, and left covered in the fridge.)

Heat a couple of tablespoons of grapeseed oil in a large pan. When it is hot add about 8 meatballs, brown them on two sides; remove to a plate and brown the next batch (they should not be cooked though). Once they have all been browned return them to the pan, and add the fava beans, the lemon juice, and the cup of chicken broth. Over high heat shake the pan to get the beans in touch with the hot liquid. They will begin to lose its fresh green color. After 5 minutes add the knotweed (or peas) and continue cooking until they are tender.


Taste the pan juices, and add salt and pepper. Just before removing the pan from the heat drizzle the tablespoon of olive oil over everything and add the torn up mint leaves. Stir to allow the oil to emulsify, and serve at once, in bowls.

Good with buttered basmati and dilled yogurt.

* Pick knotweed only where you see the previous season's canes growing above the shoots. This indicates that no weedkiller (usually Roundup) has been sprayed there.


Wednesday, March 2, 2022

Artichokes Barigoule and Some Men


First published on 24 July 2011

I adore artichokes. Curiously, most men I know do not. The same men don't like eating quail, or crabs. They say they are 'work'. I don't get it. Where they see work I see fun. Hm. Perhaps the men who don't like them are also men who don't cook? Weigh in if you have thoughts about this. Yes, you, too, men.

On the subject of which. Digression: for a month in August my 76-year-old  mom has to get up at sparrow fart to...cook my dad breakfast before he goes to work. Really. Why? Because Selina, their housekeeper, whose usual wonderful duty this is, is on holiday. The little table in the kitchen is laid, and he gets fruit - peeled and chopped  in a bowl (when his white cat Spook was in the land of the living she would share his papaya or melon, which she loved), tea, toast and...I think oats. I still hate oats (from silent early morning breakfasts at the same table when I was at school). He sits there in the window seat in his suit, polished shoes, and carefully combed hair, and has breakfast. It's another world. 

Back to artichokes. 

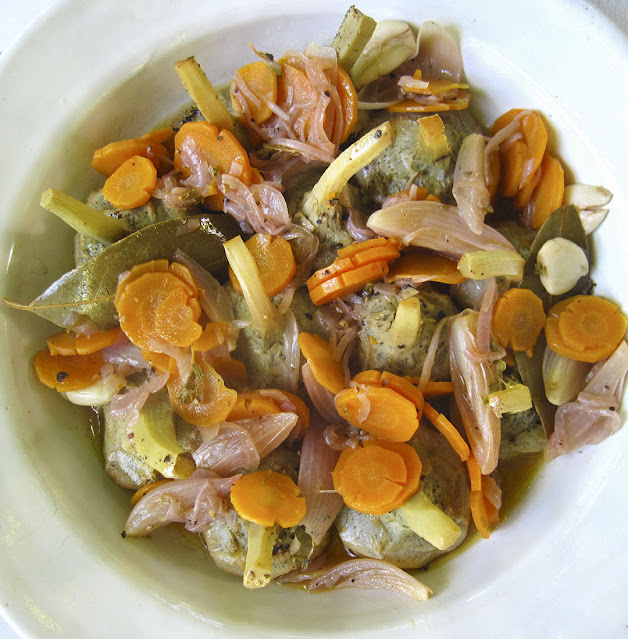
Here is a recipe where the cook does all the work, so I don't make this very often. It is time consuming, but the effort is rewarded by  the creamy, tangy combination of soft artichokes and herby, herb-perfumed sauce. The quantities are guidelines only. Figure on one artichoke heart per person if this is one of many dishes served at long summer lunch, as this one was, on New Year's Day, in Cape Town. Or share this amount with one special friend, as a main course with crusty bread and sweet butter.

If you want to be meaty, no harm in adding a few slices of pancetta to this.

10 medium artichokes
1 lemon's juice
1 big sweet carrot, sliced thinly
1 medium onion, sliced thinly
6 garlic cloves, peeled
3 tablespoons olive oil
2 bay leaves
4 sprigs thyme
Salt and freshly ground black pepper
1/2 cup dry white wine
More lemon

Cut the stems of the artichokes to about 1 1/2 inches. Cut off the artichoke tops, then break off three or four rows of leaves from the base. Peel all the green from the artichoke bottoms and stems, and sprinkle each with lemon as you finish trimming it. Place them in cold water acidulated with the juice. Your fingers will become stained from peeling, so consider gloves.

Gently spread the leaves of each artichoke, and use a small spoon to remove the choke.

Peel the carrot and the onion, and cut them into thin slices. Chop three cloves of garlic, keeping the others whole.

To a heavy, non-reactive pan or heat-proof dish over medium heat, add the onion, carrot and all the garlic to the olive oil. Slowly cook until the onion begins to turn golden, and the carrots caramelize slightly. Then add the artichokes, stem side up. Add the herbs. Season with salt and pepper.

Pour the wine over the lot, and add enough water to barely cover the artichoke bottoms. Cover and cook over medium heat for about 30-40 minutes, or until the hearts are tender when pierced, then remove the lid and reduce the cooking liquid over high heat to thicken the sauce. Taste - very important. Correct seasoning and add another splash of lemon juice.

Serve warm or at room temperature. I prefer the latter in summer, of course.

Sunday, February 6, 2022

Pork shoulder with anchos and orange

[First posted 5/21/2010; hence awful pictures. But really good pig!] 

Eric had five helpings. He may have had six. It's a bit like War and Peace. I can't remember whether I've read it six times. It may be five or it may be seven. If I read it first in 1994, and it's fourteen years later, once every couple of years...it could be seven. Or six, since I could almost read it again. The point is, after the fourth time, does it matter? 

I kept telling him he'd be sick, but was very happy to keep spooning out meaty pieces from the large clay bowl where the pig, long fallen from its bones, was lying in the dark sauce of ancho, tomato, caramelized onion, Turkish dark pepper, lime, orange, thyme, oregano, brown sugar, pepper. With full-fat, organic sour cream to grace its rich, sweet, peppery corners, it was a bowl of very delicious pork.


The idea (pig/orange/tomato combo) came originally from Diana Kennedy's The Art of Mexican Cooking. Then I winged it.


Pork Shoulder with Anchos amd Orange
Feeds 6 - 8

Start prep at 10am in the morning. This is an all-day pig.

1 pork shoulder, skinned and slashed deeply (2")
1 teaspoon salt
1/4 teaspoon freshly ground black 
2 Tbsp brown sugar
5 tomatoes, broiled till black (it sweetens them), keep skins on
2 medium yellow onions, quartered
Half a head of garlic, cloves peeled and flattened
2 oranges, juice squeezed and pulp reserved
2 limes or lemons, juice squeezed
1 orange, thinly sliced
4 ancho chiles, soaked in boiling water, then sliced into ribbons. Remove stalks, keep seeds.
2 Tbsp Urfa biber
5 stalks thyme 
5 stalks oregano

In a deep roasting dish, season the surface of the slashed pig with salt and pepper and all the sugar. Place broiled tomatoes whole on top of shoulder and squash down. Pour orange and lime juice over this, and add any orange pulp as well as the sliced orange. Tuck onion, garlic, sliced anchos and seeds, and herbs under and around the shoulder. Cover tightly with foil.

Assuming you're eating the pig that night, transfer the roasting dish to 250'F oven. Go out to work, if that's what you do. Worry not.

At about 6pm uncover your pig. Pour the significant amount of cooking liquid into a saucepan and reduce until you have about two cups. You may want to add some lime juice or salt or sugar, or another (soaked) ancho. Make sure there are no stray bones lurking amongst the melting meat. If you have a blender, blend the reduced sauce till smooth and return to heat to keep warm. Meantime place pig in a serving platter. Pour over sauce. Serve in bowls, with sour cream alongside.

Eric said that this is better than the Ginger Ale pig. Mimi looked shocked. Blasphemy.


Precede with guacamole, accompany with margaritas and follow with mangoes.

2 parts Tequila
2 parts fresh lime juice
1 part Cointreau 

Shake like the blazes with plenty of ice. Pour.

Monday, November 29, 2021

How to make hominy


[First published 10 September 2010. Updated 29 November 2021]

What is hominy? Properly prepared, it is nixtamalised (alkali-treated), cooked dry corn (usually dent, but also flint/field corn) whose skins and germ have been removed. Its texture is luscious and its scent is rich and honey-like. 

Hominy is an essential part of pozole, a stew whose Aztec origins may have required as an ingredient chopped-up sacrificial warriors. Now, pork has to suffice. 

And for a vegan version I'd use roasted squash, added very late so it doesn't become too soft.

This hominy-step is Part One of the first pozole I ever made, using the artist Christina Kelly's native Northeastern shortnose white corn, raised in Prospect Park in 2009.

The hunt for kal/pickling lime/lye (calcium hydroxide) - specified in all hominy recipes by cooks who never tell you where they purchased their kal - ended with my decision to try an alternative: baking soda. The chemicals loosen the husks and the hard germs of the dried corn, make more nutrients available, and allow it to 'bloom' as it becomes soft. The traditional lye would be made from wood ash.

Luckily, baking soda works well. Still, it's a commitment, in terms of process.


On with the show. This method is a hybrid of several I found online and in books, and evolved with subsequent practise. It yields tender yet firm hominy, whose flavor is wonderful. Begin two days before you intend cooking the pozole. There are two long soaking periods.

2 cups dry flint corn (yields about five cups, cooked)
8 cups of water
3 Tablespoons baking soda (sodium bicarbonate)

First Two Soaks:

In a large pot combine corn and water. Bring to a boil, and add the baking soda. 

At this point white corn turns miraculously yellow.

Keep at a gentle simmer for one hour. Then let the corn stand in the water until cool. By now the kernels will have plumped up and the coverings of the germs (at the narrow tip of each kernel) will be dark. Pour the water off, and fill the pot again with cool water and rinse, stirring with your hands. Rub handfuls of corn against one another to loosen any skins. Pour the water off. 

Cover the corn with water again and let it stand for 12 hours or overnight. Drain.


Now you're going to remove the dark covering that protects each germ. 


With your thumbnail, pinch off this little black sheath at the tip of each kernel. It covers the germ, which is like a tiny backbone in the kernel. 

Third Soak:

When you have removed all these sheaths, soak the corn for another 12 hours, then drain. (You can try and skip this last soak, and wiggle out the germ at the same time as the sheath-removal, but it's much looser and easier to remove once the sheath is off and the corn is re-soaked.)


The germs swell up after that last soak. They feel harder than the rest of the kernel. True hominy does away with this kernel, hence the effort.


Wiggle out the germ. You will now have a groove in the middle of each kernel, where the germ was. 

After this painstaking process, rinse the kernels thoroughly.

Your corn is ready to cook! Fill a pot with water again, add the prepared corn, and bring to a simmer. Cook gently for about forty minutes, until the kernels are just fork-tender.


You have made hominy.


This lovely stuff can be served as a side dish to practically anything, or eaten with maple syrup and milk. Or you know, next step pozole.

Would I do this often?

Hell, no.

But the real deal tastes and feels so much better than the canned versions. It also says something about how and why we cook, and what we bother to feed ourselves, and who lived here before most of us did.

Thursday, November 18, 2021

Cranberry-Apple Fizz


This aromatically tart and sweet ferment has a strong spicebush presence.

Spicebush is the fruit of Lindera benzoin, native in the Northeast and also east of the Rockies. It grows naturally in the understory or on the edges of woodlands. The flavor and scent are reminiscent of orange zest, to me. I use spicebush more than any other wild flavor in my kitchen (consult Forage, Harvest, Feast to learn more about it and see lots of recipes).

This cranberry-spicebush mixer plays beautifully with applejack, bourbon, whisky, dark rum, or Tequila reposado or añejo, and Lillet. Also sparkling wine (just a dash before topping with bubbly). It has a great affinity for apple ciders and apple syrups, citrus, ginger, and Earl Grey tea. Think hot toddies and no-alcohol mocktails, too: Mixed 50-50 with sparkling water it makes a zero octane drink. 

And use it to deglaze a roasted carrot, parsnip, duck, or pork pan. It loves yams and pumpkin. And tropical fruit salads.

Compared with most of the flowers and fruits I use in fermenting, cranberries ferment slowly. I used to think it was because they were too well washed, so were rinsed of microbes. But it is probably because cranberries contain antimicrobial properties, which inhibit fermentation.  So I add some unpeeled apple slices to my mixture to help the yeasts along.

Start one week before you need it.

12 ounces cranberries, lightly crushed
½ an apple, cut up (cored but not peeled)
1 cup sugar
¼ cup freshly ground spicebush berries*
5 cups water

* Substitution: If you have fresh spicebush twigs from your own tree or a wild one, scratch them up to release more scent, then tie them in a bundle that fits in your jar. The bundle's cinched waist should be about a half-inch in diameter, for enough flavor to seep into the infusion.

Place the fruit in a clean jar. Add the spicebush and sugar, and top with water. Stir well (or screw the lid on and shake). To ferment, either leave the lid on loosely, or cover the jar with cheesecloth or a paper towel secured with elastic or string. Stir daily. Small bubbles rising are a sign of fermentation. It could take several days. After the bubbles have been active for at least a couple of days (and up to seven, but each ferment is different) I strain the fruit from the liquid twice: through a double mesh strain and a double folded, damp cheesecloth. The spicebush can clog up the straining, so use fresh or rinsed cheesecloth if the liquid stops passing through. Bottle the strained, amber liquid and keep in the refrigerator until needed.

If fermentation didn't take place (too cold, perhaps), don't worry - the flavor will still be very good. Give it a taste.

If you have not foraged your own spicebush fruit, buy dried spicebush (sold as Appalachian Allspice) from Integration Acres, online. The quality is excellent.

Friday, October 22, 2021

Grenadilla Mousse


Whenever I visit Cape Town in summer I can't resist the grenadillas (passionfruit). Abundant, cheap, and tropically complex. Or dropping fatly from the vine growing outside the study of my parents' house. There seems no reason why they should not be as abundant and affordable in the United States - but perversely they cost a fortune (a dollar or more, each). Grow your own if you live in a mild climate. 

(Circa 2021 - or order them from Rincon Tropics, my new best fruit friends in California)

This tartly sweet, creamy mousse belongs on a dessert cart straight from the middle of the last century. It is old school and delicious. I adapted it a very long time ago from a Georges Blanc recipe in his book Ma Cuisines des Saisons. It was - is - a required end to a lunch under the enormous plane tree in my mother's garden.

I love to make this mousse perfectly smooth, but you could also leave the seeds in it, in which case skip the food processing part.

Use a single jelly mould for a large mousse, or individual moulds if you're being fancy and giving everyone their own. They need a knife around the edge and a dip in just-boiled water, then a swift upside-down shake to release.

Serves 8 - 10

20 grenadillas (yield is about 1 3/4 cups juice), chilled
3 1/2 teaspoons powdered gelatine
3 tablespoons boiling water
750 ml (3 cups) whipping cream, chilled
150 grams (5.29 oz) sugar

Halve the grenadillas and scoop the pulp into the bowl of a food processor. Pulse for about 15 seconds to separate the pulp from the seeds. Place a fine-mesh sieve over a bowl and strain the pulp through the sieve, extracting as much juice as possible. Discard the seeds.

Pour about a quarter of the juice into a small bowl and sprinkle the gelatine onto it, swooshing the juice around to cover and soak the granules. Stir to make sure there are no lumps. Add the 3 tablespoons of boiling water and stir again. When the mixture is perfectly smooth, whisk the gelatine-juice back into the rest of the juice.

In a large bowl whisk the cream until it thickens slightly. Add the sugar to the cream and continue whisking until the cream holds soft peaks.

Pour the grenadilla juice into the whipped cream, then fold rapidly using a spatula to blend the mixture well. When no bright yellow juice remains at the bottom of the bowl, pour it into your jelly mould/s (or a round bowl). Cover, and transfer to the fridge. Chill until it is set (about three hours, minimum).

To unmold, dip the mold for about 6 seconds in extremely hot water (too long and the outer layers will melt). Invert onto a flat serving dish and shake hard. You should hear a satisfying plop. If you don't, try running a hot knife around the edges of the mousse, and repeat. Chill until needed.

Serve with freshly cut grenadillas arranged around the edges of the pale mousse.


Monday, October 18, 2021

Old Fashioned Raisin Bars


I first posted this recipe, minus feral options, in 2008. (I know!)

Because they are so good, I have refreshed them. These deliciously moist, spiced cookies satisfy every craving, and were my favorite childhood treat. Now, I make them with dried, fermented Aronia, serviceberries and spicebush. (If you own a copy of Forage, Harvest, Feast - A Wild-Inspired Cuisine, you will know how to make those.) I have also trimmed the sugar, a little! 

Since it is peak Aronia (aka chokeberry) season here in the Northeast, here is the recipe again.

The recipe doubles, very well, if you are feeding a crowd. Just bump up the tray size to 16 x 12 inches.

Spice Bars

Makes 15 cookies 2 x 2-inch cookies

5.6 oz (155 g) raisins or currants (or mixed, dried Aronia and serviceberry)
1 cup (250 ml)  water
1/2 cup  (125 ml) vegetable oil
6 oz (170 g) sugar
1 lightly beaten large egg
8 oz (220 g) all-purpose flour
1/4 teaspoon salt
1 teaspoon baking soda
1 teaspoon cinnamon
1/2 teaspoon allspice*
1/4 teaspoon cloves*
2 1/2 oz (70 g) toasted, chopped pecans (or walnuts, hazelnuts)

* Forager's alternative: skip the allspice and the cloves (keep the cinnamon) and use 2 teaspoons of ground spicebush (Lindera benzoin), instead.

Preheat the oven to 375'F (190'C). Line a 9.5 x 12-inch jelly roll with buttered parchment.

Combine the raisins or currants (or wild dried fruit) with the water in a small saucepan  and heat to boiling point. Remove from the heat and cool to lukewarm. Stir in the oil, sugar and the egg (if it is still hot the egg will scramble).

Combine the dry ingredients in a bowl and pour in the wet ingredients. Stir. Add the nuts.

At this point my mother's original handwritten recipe says, "Pour into a greased Swiss roll tin." This is sweet. Why did we call them Swiss rolls? But we were fed freshly-made Swiss rolls, sugary on the outside, stuffed with apricot jam, for a special dessert. Those were in the days of sit-down lunches. Father in suit, home from chambers, children in school uniforms, home from school. Doris Day singing in the kitchen. Milk to drink, from a jug on the table. Milk.

It was white South Africa. Where the late 70's looked a lot like the American 50's.

Don't worry, it all fell apart, later. Not just the country - the illusion of the family idyll. We were both broken.

Back to the cookies!

Pour the batter into the prepared pan. Bake for 12-15 minutes until a skewer comes out clean.

Loosen the edges and flip the sheet of cookies over onto a wire rack to cool.

When cool, frost with confectioners sugar mixed with lemon juice. This is important - the tartness provides a beautiful edge. After this icing has dried completely, slice into squares.

Try not to eat them all at once. They are good for everything. Stress, sadness, loss, or an excess of anything.

And brilliant for breakfast with a cup of strong coffee.

Monday, February 15, 2021

Kale gnudi with mugwort brown butter


These tender dumplings, fragrant with lemon zest and sweet with heaps of slightly charred kale, are dressed with nutty brown butter and crisp spring mugwort. They are rustic and deeply delicious.

Why gnudi? Because of their high ricotta content, luscious gnudi are much softer (er, less rubbery?) than flour-rich gnocchi. And while blackened kale is uniquely sweet you can use any leafy green as a base (but blanched and squeezed dry - the meaty kale is neither blanched nor squeezed), bearing in mind that many leaves, like spinach, lose more volume than kale when cooked.

(See Variations below, for those weights and other spice and herb options.)

Tips: Use as little flour as you can get away with in the dusting process – it forms the lightest of skins, and that is all you need. The gnudi can be made a day ahead and kept cold (covered) in the fridge. Also, gnudi cook fast and do not like to be kept waiting once ready, so have the brown butter ready to go the minute they are all plated.

Gnudi: Makes about 36

1 lb washed kale
15 oz ricotta
½ cup Panko breadcrumbs
1 teaspoon microplaned lemon zest
½ cup microplaned parmesan
¼ teaspoon salt plus a large pinch
Black pepper to taste
1 large egg
Flour for dusting, about ½ cup or less

Mugwort Brown Butter:

4 tablespoons butter
20 tender mugwort tips or single leaves

To serve:

¼ cup microplaned parmesan
2 teaspoons urfa biber (or black pepper)

Variations:

1. Substitute 1.5 lbs spinach, garlic mustard, nettles, radish or turnip tops for the kale. Blanch in boiling water, shock in cold and squeeze very dry before puréeing.
2. Substitute ¼ teaspoon grated nutmeg for the lemon zest
3. For the sauce: Substitute fresh or dried summer savory or sage for the mugwort.

For the gnudi: Fill a large, lidded pot with an inch of water. Bring to a boil over high heat. Pile the kale leaves in and cover. Steam until they lose volume and start to soften. Turn them once or twice. Continue cooking over high heat as they lose their vivid color. As the water dries up their sugars begin to darken the bottom of the pot. Turn a couple of times so more of the leaves blacken slightly at the edges and turn a little crisp. The blackening makes them sweet. When they threaten to really stick to the pot, turn them out into a strainer set over a bowl to cool.

Transfer the kale to a food processor and pulse until very smooth. Turn the purée into a mixing bowl and add all the other gnudi ingredients except the flour. Mix well. Taste for seasoning (unless you are worried about raw eggs and Salmonella). Add more salt or pepper. If you have the time, place the bowl in the fridge to chill the mixture for 30 minutes – it just makes it easier to handle.

Sprinkle flour evenly on a work surface. Using a spoon, scoop portions of the mixture onto the flour: I use a dessertspoonful to make gnudi about 1 ½ inches long. Shape the scooped mixture into a small log between your palms, denting the top to hold some warm butter, later. Lightly dip each side in flour. Place on a lightly floured plate while you make the rest. When one plate is full keep it chilled in the fridge while you work on the second batch.

Chill the shaped gnudi for at least 30 minutes and up to 24 hours.

To cook: Bring a large pot of water to the boil. (While it is heating start the brown butter sauce.) When the water is boiling drop the gnudi in gently one at a time, working in batches if necessary. They are done when they bob to the surface (they remind me of the barrels in Jaws). Use a perforated spoon to scoop each one out at once, resting the spoon briefly on a clean kitchen towel to absorb dripping water, before transferring to a warm waiting platter or individual plates. When they are all done, top quickly with a flurry of extra microplaned parmesan, black pepper or urfa biber, and the waiting, hot brown butter.

For the brown butter: Make this while the gnudi-water is coming to a boil. Melt the butter in a pan over medium high heat. When it foams add the mugwort leaves. Cook, tilting the pan so the butter runs over the leaves, until the butter begins to turn brown. Turn the heat off at once. Just before serving, heat the butter again briefly and spoon at once over the plated gnocchi.


Sunday, December 20, 2020

Rusk recipe

Rusk - Marie Viljoen

I grew up with these rusks, and adapted this recipe from my mom's, which uses self-raising flour - an ingredient close to non-existent in the US. If you do have self raising flour, just skip the baking powder listed in my recipe.

The sweet clover (Melilotus species) is optional - I collect it every summer to dry and use through the year.

Makes 22 whole rusks, 44 halves 

2 cups milk
1 cup sugar 
2 lbs flour 
9 teaspoons baking powder (that is not a typo - nine teaspoons)
2 teaspoons dried yellow sweet clover 
2 teaspoons cream of tartar 
1½ teaspoons salt 
½ lb (2 sticks) cold, unsalted butter 

Preheat oven to 400’F.

Heat the milk in a saucepan and add the sugar, stirring until the sugar dissolves. Allow to cool until tepid.

Butter or line a large baking sheet (or two).

In a large bowl, combine the flour, baking powder, sweet clover, cream of tartar, and salt. Grate in the cold butter, toss with the flour, and rub between your fingertips until it resembles small crumbs. Pour the milk into the dry ingredients and mix well but briefly (overworking will make the rusks tough). 

When it is mixed, use your dominant hand (or a spoon) to remove chunks from the soft dough (approx. 4 inches x 2 ½ inches, or about 3¼ oz weight, for biscuit-sized rusks). Shape gently and briefly into casual oblong shapes. Jagged edges are fine. Place them in rows on the baking sheet with about a half-inch between them.

Bake for about 20 - 23 minutes. They should not be brown - more blonde. Remove and while still warm gently break each rusk apart using forks, or slice gently apart with a bread knife. When the oven is cooler dry them completely for about 6 hours at 200'F or lower. They are ready when they are shatteringly dry.

Monday, November 23, 2020

Quick Cranberry Syrup


Unlike the cold-extract syrup I make that takes days to yield (a very compelling) juice, this syrup is fast - ready in 30 minutes. All you need to make this versatile mixer is a bag of cranberries, water, and sugar.

12 ounces of cranberries
2 cups of water
1 cup of sugar

Combine the fruit, sugar and water in a saucepan and bring to a boil over high heat. Lower to a simmer for 25 minutes.

Strain through a fine mesh sieve. When a little cooler, bottle. The cranberry syrup keeps well for a month in the fridge.

(I use the strained, leftover fruit to make a fruit leather, spread out on a silpat mat after cooking it down for another hour on very low heat.)

Thursday, November 19, 2020

Persimmon loaf

This is an inviting autumnal loaf that I developed for persimmons. It is fragrant with dried ginger and spicebush - if you don't have spicebush, substitute 1 teaspoon microplaned or finely chopped orange zest

Any ripe persimmon can be used, including the small native American fruit (Diospyros virginiana). If you are using those, or the large, pointy Asian Hachiyas, they should be gelatinously ripe. If not they will taste furry and tannic and ruin the bake. And the native 'simmons and Hachiyas often have seeds, so work them through a food mill or remove by hand. 

Fat-bottomed Fuyus (shown above) are ripe when firm, but mash up their pulp so that it is smooth, for this recipe. You can do this by kneading the flesh hard through the skin, using your thumbs, then scooping it out, or in a food processor. A few small, remaining chunks are OK.

Like native American pawpaws (Asimina triloba), persimmon pulp is dense and the baking time is quite long, as a result.

Makes 1 large loaf ( 5 ½" x 10 ½" pan)

1 ½ cups ripe persimmon pulp
1 ¼ cups sugar
½  cup melted unsalted butter
3 large eggs
¼ cup plain yogurt
1 Tablespoon ground spicebush
2 teaspoons ground ginger
1 teaspoon salt (this is not a typo)
3 cups all-purpose flour
1 tablespoon baking powder
2 teaspoons baking soda

Optional topping

1 Tablespoon Fir Sugar* (or mix sugar with ginger, or a pinch of cloves)

* See Forage, Harvest, Feast for Fir Sugar (and to learn about spicebush!).

Preheat the oven to 350'F/180’C.

Butter a loaf pan 5 ½" x 10 ½" pan (or use two small loaf pans, or even muffin trays, but reduce the baking time to about 50 and 25 minutes, respectively).

In a large bowl, combine the persimmon pulp, sugar, melted butter, eggs, yogurt, spices, and salt. Beat them together until smooth. Add the flour, baking powder, and baking soda and stir these into the wet mixture with a spoon, using as few motions as possible. Transfer the batter to the buttered pan, sprinkle the sugar topping across the batter (if using), and slide into the oven.

Bake for 70 minutes, or until a skewer or toothpick inserted fully into the thickest part come out clean. Gently tip the loaf from the baking pan and allow to cool on a wire rack before slicing.

Friday, June 19, 2020

Moist chocolate cake with oil


I had a serious craving for chocolate cake recently. I wanted one that was moist and dark, but also one where I didn't have to cream a lot of chilly butter with sugar. (I hate my Cuisineart 5-speed electric beater; it has no real slow setting and just tosses dry ingredients right out of the bowl - any recommendations?). I didn't feel like fluffing butter by hand, either. I was feeling lazy.

This chocolate oil cake version is derived from one on the Hershey's website. I modified it heavily: Less sugar, less salt, more flour, much lower baking time, and of course, the wild ingredients.


The result is a cake that is rich, dark, and delectably moist. It is both simple and outstanding. 

Photo: Irene Khin, Saffron 59 Catering

It's also easy to carry on picnics, presliced, and easily shared. 


Baked serviceberries add a hint of marzipan to the cake. And if you use the mahlab variation, instead, the flavor will be harder to define - more like marzipan and bitter almonds, but wonderful with chocolate.

I have only used a 12-cup bundt pan for the cake. You will have to adjust the baking time if you are using one regular baking pan (more baking time) or two pans for a layer cake (less baking time).

Tip: mixing cocoa with flour for dusting the pan means you won't have a weird white coating when you turn out your nice, dark cake.

Chocolate Cake

1 1/2 cups sugar
2 cups all-purpose flour
3/4 cup cocoa
1 1/2 teaspoons baking powder
1 1/2 teaspoons baking soda
3/4 teaspoon salt
2 large eggs
1 cup milk
1/2 cup avocado oil (substitute other vegetable oil)
1 cup boiling water
1/2 cup serviceberries (or small blueberries)

Pan

1 tablespoon butter
2 tablespoons cocoa
2 tablespoons flour for pan

Variation:

Instead of the fruit, add 1 teaspoon mahlab

Preheat the oven to 350'F.

For the pan: Butter the bundt pan and dust it well with a mixture of the flour and cocoa mixture. Shake any excess out.

For the cake: In a large bowl combine the sugar, flour, cocoa, baking powder, baking soda and salt. (If using mahlab, add it now.)

In another bowl beat together the eggs, milk and avocado oil.

Stir the wet ingredients into the dry, mixing well. Add the boiling water. Mix until the batter is smooth (it will be very thin, don't panic).

Pour half the batter into the prepared pan, scatter the serviceberries evenly across it, and pour in the rest.

Bake for 35 - 40 minutes until the surface of the cake springs back to the touch, or an inserted skewer comes out clean.

Remove from the oven and allow to rest in the pan on a cooling rack for 10 minutes. Then invert carefully and allow to continue cooling on a rack.

Tuck in!

Tuesday, December 3, 2019

Thai Lime Marmalade


My trees' bounty of Thai limes (Citrus hystrix - also known as makrut, but please, not the k-word) made marmalade possible. It is delicious and set to perfection.

Not everyone grows or has access to Thai limes and they do have a unique flavor and fragrance. But this recipe will work for other sour citrus.


You can use any amount of fruit, as long as you stick to the formula. 

It's a lot of sugar in the finished marmalade but by no means overwhelming; the lime's pith is bitter and needs balance. If you want to use less, begin with half the amount I recommend, stir to dissolve in the lime mixture (before boiling), then taste. If you like it, it will still set, but I think you may stick to my plan! For orange marmalade I’d suggest the same weight of sugar as the fruit's weight. And for grapefruit their weight plus half.


Note: If you do not soak citrus slices before cooking them with sugar the skin can turn hard. Soak the fruit.

Thai Lime Marmalade Formula:

Limes, first weighed whole, then measured out in cups after being sliced
Double the weight-amount in sugar
Double the cup-amount of water

These were my measurements based on my indoor harvest:

13.3 oz (2 ¾ cups, sliced) Thai limes, sliced very thinly
26.6 oz sugar
5 ½ cups water

If you are using your own amount of fruit proceed as follows:

Weigh your limes, and make note of the weight. Slice the fruit very thinly, and pick out any seeds. Measure the fruit in cups. 

Place the sliced fruit and any escaped juice in a bowl with double the cup-amount of water. Leave to soak 24 hours.

Place the fruit and the soaking water (full of valuable pectin) in a pot large enough that the liquid comes no more than half the way up, or it will boil over, later. Bring to a boil for a minute. Turn off the heat and allow to cool completely (this is still helping to soften the skin).

When the mixture is cool again stir in double the fruit’s weight of sugar. Bring to a boil over high heat, stirring until the sugar has dissolved. Insert a sugar thermometer. Keep at a furious boil until the temperature reaches 220’F. Do not be tempted to give up at 118’F, or 119’F. The last few degrees seem to take forever. Be patient.

At 220'F turn the heat off immediately.

If you do not have a thermometer use the spoon test:

Dip a large wooden or stainless steel spoon into the bubbling liquid and then hold it up sideways so the liquid tips out, and the length of the spoon is parallel to the pot below. Droplets will at first just drip quickly and thinly from the middle of the spoon. As setting point approaches they slow down and when setting point is reached two to three drops form in a more sluggish row along the bottom of the spoon. When they meet in the middle you snatch that pot off the heat.

Off the heat, the bubbles will subside. If any white foam or scum is on the surface scoop it off gently. Ladle the hot marmalade into sterilized jars. You can fill all the way but as it sets some of the fruit may rise and set towards the top with bottom just jelly. It still sets perfectly and tastes wonderful. 

If you want to distribute the fruit more evenly (once set), fill the jars in three stages, with about 5 minutes between each stage. This way the lower layers will set earlier, trapping their fruit. Don’t wait too long to complete the stages or the marmalade will set in the pan.

Secure the lids tightly.


Enjoy your toast!